mirror of
https://github.com/b4tman/sync_ics2gcal
synced 2026-02-12 11:12:23 +00:00
d146eec7ae3a5e561d89142dd74d19bfa5f5c02d
sync_ics2gcal
Python scripts for sync .ics file with Google calendar
Installation
To install from PyPI with pip, run:
pip install sync-ics2gcal
Or download source code and install:
python setup.py install
Configuration
Create application in Google API Console
- Create a new project: https://console.developers.google.com/project
- Choose the new project from the top right project dropdown (only if another project is selected)
- In the project Dashboard, choose "Library"
- Find and Enable "Google Calendar API"
- In the project Dashboard, choose "Credentials"
- In the "Service Accounts" group, click to "Manage service accounts"
- Click "Create service account"
- Choose service account name and ID
- Go back to "Service Accounts" group in "Credentials"
- Edit service account and click "Create key", choose JSON and download key file.
Create working directory
For example: /home/user/myfolder.
- Save service account key in file
service-account.json. - Download sample config and save to file
config.yml. For example:
wget https://raw.githubusercontent.com/b4tman/sync_ics2gcal/develop/sample-config.yml -O config.yml
- (Optional) Place source
.icsfile,my-calendar.icsfor example.
Configuration parameters
start_from- start date:- full format datetime,
2018-04-03T13:23:25.000001Zfor example - or just
now
- full format datetime,
- (Optional)
service_account- service account filename, remove it from config to use default credentials - (Optional)
logging- config to setup logging google_id- target google calendar id,my-calendar@group.calendar.google.comfor examplesource- source.icsfilename,my-calendar.icsfor example
Usage
Manage calendars
manage-ics2gcal <subcommand> [-h] [options]
subcomands:
- list - list calendars
- create - create calendar
- add_owner - add owner to calendar
- remove - remove calendar
- rename - rename calendar
Use -h for more info.
Sync calendar
just type:
sync-ics2gcal
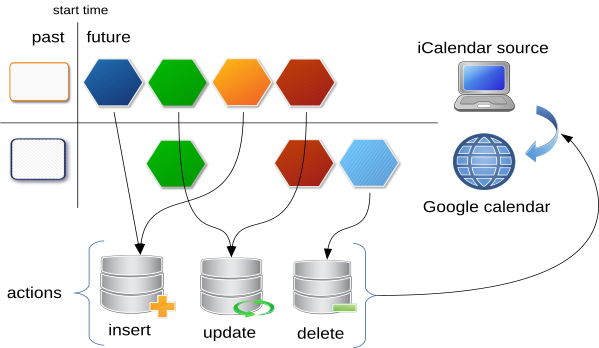
How it works
License
Languages
Python
100%
